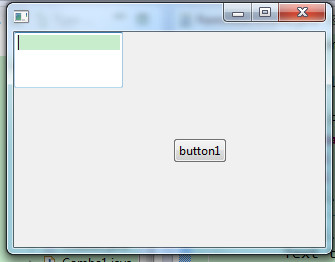
表格式(FormLayout类) 表格式布局管理器,通过创建组件各个边的距离来布局组件,和GridLayout一样强大.
用GridLayout与FormLayout都可以实现相同的界面效果,但有时使用后者会更有效,而且不会像GridLayout因为容器大小变化而导致布局错位.
使用marignWidth,marginHeight设置边距(这两个属性,来设置容器的左边距和上边距(单位:像素))
使用FormData的构造函数(FormLayout也有自己的布局数据类,他的使用方法是new FormData()或new FormData(int width,int height))
FormAttachment类的用法
FormAttachment是在FormData下的,更进一步的布局数据类,它的用法主要体现在它不同的构造函数中.
FormLayout1.java
1 import org.eclipse.swt.SWT; 2 import org.eclipse.swt.layout.FormLayout; 3 import org.eclipse.swt.widgets.Button; 4 import org.eclipse.swt.widgets.Display; 5 import org.eclipse.swt.widgets.Shell; 6 7 public class FormLayout1 { 8 public static void main(String[] args) { 9 final Display display = Display.getDefault();10 final Shell shell = new Shell();11 shell.setSize(327, 253);12 // ---------创建窗口中的其他界面组件-------------13 FormLayout formLayout = new FormLayout();14 formLayout.marginWidth = 100; // 左边距,单位:像素15 formLayout.marginHeight = 50; // 上边距16 shell.setLayout(formLayout);17 new Button(shell, SWT.NONE).setText("button1");18 // -----------------END------------------------19 shell.layout();20 shell.open();21 while (!shell.isDisposed()) {22 if (!display.readAndDispatch())23 display.sleep();24 }25 display.dispose();26 }27 }

1.使用marginWidth,marginHeight设置边距
这两个属性用来设置容器的左边距和上边距(单位:像素).下面给出一个具体的实例:
1 public class FormLayout1 { 2 public static void main(String[] args) { 3 final Display display = Display.getDefault(); 4 final Shell shell = new Shell(); 5 shell.setSize(327, 253); 6 shell.setText("SWT Application"); 7 // ------------------新插入的界面核心代码------------------------ 8 FormLayout formLayout = new FormLayout(); 9 formLayout.marginWidth = 100;10 formLayout.marginHeight = 50;11 shell.setLayout(formLayout);12 new Button(shell, SWT.NONE).setText("button1");13 // ------------------END---------------------------------------------14 shell.layout();15 shell.open();16 while (!shell.isDisposed()) {17 if (!display.readAndDispatch()) {18 display.sleep();19 }20 }21 }22 } 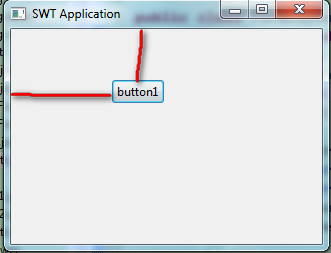
2.使用FormData的构造函数
FromLayout也有自己的布局数据类FormData,它的使用方法是:new FormData()或者new FormData(int width,int height)
1 public class FormData1 { 2 public static void main(String[] args) { 3 final Display display = Display.getDefault(); 4 final Shell shell = new Shell(); 5 shell.setSize(327, 253); 6 shell.setText("SWT Application"); 7 // ------------------新插入的界面核心代码------------------------ 8 shell.setLayout(new FormLayout()); 9 // new FormData ()10 Button button1 = new Button(shell, SWT.NONE);11 button1.setText("button1");12 FormData formData = new FormData();13 button1.setLayoutData(formData);14 // new FormData (int width, int height),单位:像素15 Button button2 = new Button(shell, SWT.NONE);16 button2.setText("button2");17 FormData formData2 = new FormData(200, 50);// button2变成200长,50宽18 button2.setLayoutData(formData2);19 // ------------------END---------------------------------------------20 shell.layout();21 shell.open();22 while (!shell.isDisposed()) {23 if (!display.readAndDispatch()) {24 display.sleep();25 }26 }27 }28 } 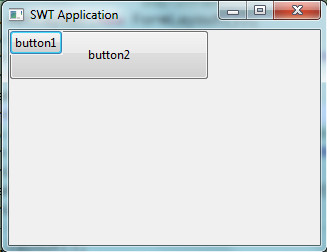
3.FormAttachment类的用法:
FromAttachment是在FormData下的,更进一步的布局数据类.它的用法体现在他不同的构造函数中.
(1) new FormAttachment(int numerator,int offset)
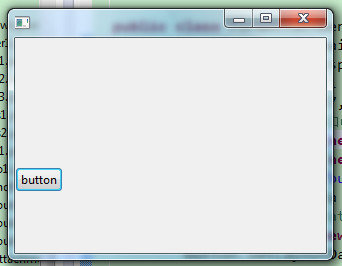
button1的顶边(fromData.top)离shell容器的空白边距是shell容器总体空白长度的60%.
偏移的点数(points)为0,效果如下:
1 //>>>>>>>>>>>>>>>华丽丽的分割线>>>>>>>>>>>>>>>>>>>>>>>>>>>> 2 shell.setLayout(new FormLayout()); 3 new Text(shell, SWT.BORDER).setText("text1"); 4 //将button1应用FormData 5 Button button1 = new Button(shell, SWT.NONE); 6 button1.setText("button1"); 7 8 FormData formData = new FormData(); 9 formData.top = new FormAttachment(60, 0); // button1的顶端应用FormAttachment设置10 button1.setLayoutData(formData);11 12 //>>>>>>>>>>>>>>>华丽丽的分割线>>>>>>>>>>>>>>>>>>>>>>>>>>>> 
如果改成了 formData.top = new FormAttachment(60, 30)
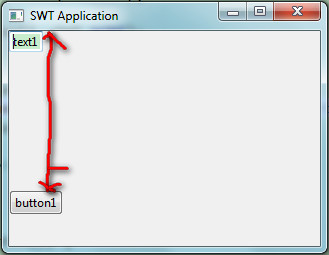
从图中更以看出FormAttachment(60,30)是先按照FormAttachment(60,0)
的方式布局后,再下移动10个像素.这个地方有一个布局的次序.
new FormAttachment(int numerator)相当于new FormAttachment(int numerator,int offset)
当offset=0时,new FormAttachment(int numerator,int offset)相当于FormAttachmetn(int numerator,int denominator,int offset)当denominator(分母的意思)=100时,其中denominator是分母,例如FormAttachment(30,50,0)就是长度比例为30/50=60%,也就是和FormAttachment(60,0)的效果是一样的.
(2) new FormAttachment(Control control,int offset,int alignment)
参数1是一个Control类,一般在使用的时候,都传入一个组件(如文本框来做参数),应用此FormAttachment的组件将
依据参数1的contorl为基准来布局,offset为离control偏移量(单位:像素),alignment为对齐方式.
下面给出一个例子:
1 //======================华丽丽的分割线=========================== 2 shell.setLayout(new FormLayout()); 3 Text text1 = new Text(shell, SWT.BORDER); 4 text1.setLayoutData(new FormData(100, 50)); 5 //定义并设置FormData 6 FormData formData = new FormData(); 7 //以text1为基准偏移50像素 8 FormAttachment formAttachment = new FormAttachment(text1,50); 9 formData.top = formAttachment;10 formData.left = formAttachment;11 // 将button1应用FormData12 Button button1 = new Button(shell, SWT.NONE);13 button1.setText("button1");14 button1.setLayoutData(formData);15 //======================华丽丽的分割线=========================== 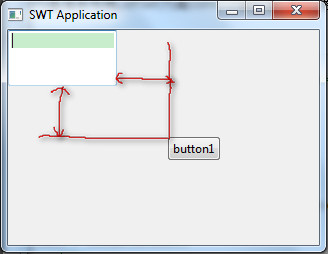
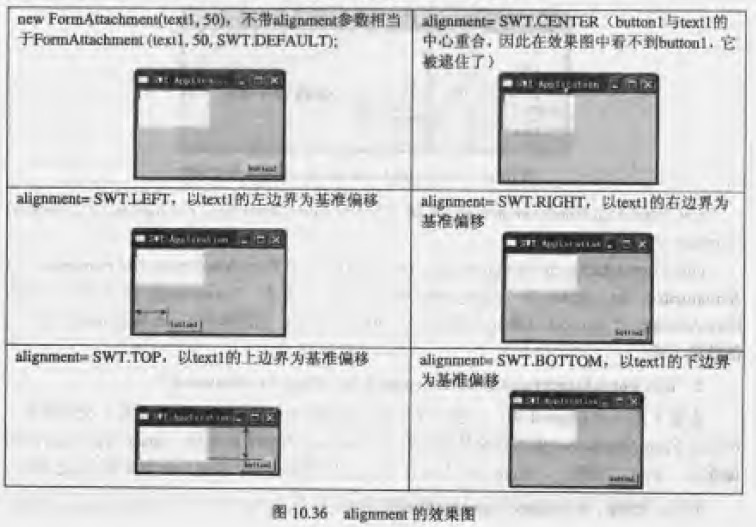
new FormAttachment(text1,50,int alignment)中alignment的设置的效果如图所示,
表中的效果的程序就是按照上面的代码为基础修改"FormAttachment formAttachment = new FormAttachment(text1,50);"
这一句得到的.
FormAttachment1.java
1 public class FormAttachment1 { 2 public static void main(String[] args) { 3 final Display display = Display.getDefault(); 4 final Shell shell = new Shell(); 5 shell.setSize(327, 253); 6 // ---------创建窗口中的其他界面组件------------- 7 shell.setLayout(new FormLayout()); 8 Button button = new Button(shell, SWT.NONE); 9 button.setText("button");10 FormData formData = new FormData();11 // 按钮的顶端(formData.top)离shell容器的空白边距是shell容器总体空白长度的60%12 formData.top = new FormAttachment(60, 0);13 button.setLayoutData(formData);14 // -----------------END------------------------15 shell.layout();16 shell.open();17 while (!shell.isDisposed()) {18 if (!display.readAndDispatch())19 display.sleep();20 }21 display.dispose();22 }23 }
FormAttachment2.java
1 public class FormAttachment2 { 2 public static void main(String[] args) { 3 final Display display = Display.getDefault(); 4 final Shell shell = new Shell(); 5 shell.setSize(327, 253); 6 // ---------创建窗口中的其他界面组件------------- 7 shell.setLayout(new FormLayout()); 8 Text text1 = new Text(shell, SWT.BORDER); 9 text1.setLayoutData(new FormData(100, 50));10 // 定义并设置FormData11 FormData formData = new FormData();12 // 以text1为基准偏移50像素13 FormAttachment formAttachment = new FormAttachment(text1, 50);14 // FormAttachment formAttachment = new FormAttachment(text1, 50,15 // SWT.LEFT);参数3的可选值包括SWT.DEFAULT、SWT.LEFT、SWT.CENTER、SWT.RIGHT、SWT.TOP、SWT.BOTTOM16 formData.top = formAttachment;17 formData.left = formAttachment;18 // 将button1应用FormData19 Button button1 = new Button(shell, SWT.NONE);20 button1.setText("button1");21 button1.setLayoutData(formData);22 // -----------------END------------------------23 shell.layout();24 shell.open();25 while (!shell.isDisposed()) {26 if (!display.readAndDispatch())27 display.sleep();28 }29 display.dispose();30 }31 }
